 |
 |
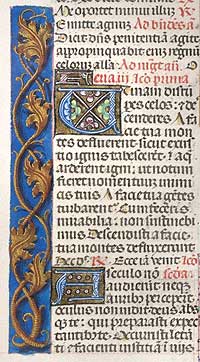
| A detail of folio 25r from the Breviary of Isabella I of Castille |
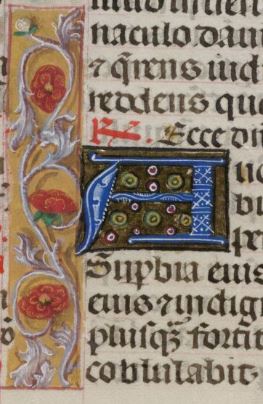
A detail of folio 16v with similar leaves in white and pink roses on a yellow ochre background. |
by Darine Morwiggin
The Breviary of Isabella I of Castille is one of the most lavish illuminated manuscripts of all time. The Spanish ambassador Francisco de Rojas, presented it to Queen Isabella, who was at that time the wealthiest woman in the world. Six of the best illuminators of the 15th century worked on it and it was intended to celebrate the marriages of her son and daughter to Austrian royalty and to commemorate the discovery of the New World by Christopher Columbus. (For more on Isabella, see A Princess with a Mind of Her Own.)
This little book (only 9" tall and 6.3" wide) has over 1000 pages the way we count them, or 500 leaves front and back. Every one of them is decorated with multiple borders and illuminated capitals. About every four pages there is a large miniatures or a full page illustration. Though very little gold or silver on these pages, the colors are intense and pop right off the page. The breviary was obviously designed with the queen in mind. Much of the imagery is feminine with lovers, children and cute animals in the borders.
Here is a step-by-step lesson in how to paint borders in one of the styles used in this fabulous illuminated book. This is a trompe l'oeil (fool the eye) or illusionistic border that looks like twisted twigs and leaves laying on the page. When worked small, it is quite impressive.
 |
Materials and tools
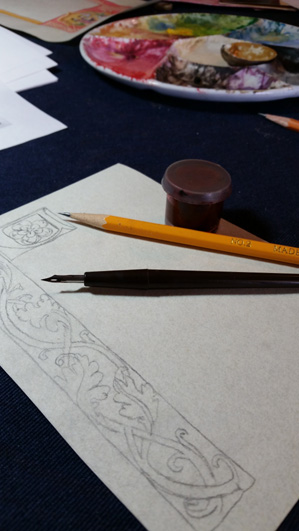
Step 1: Drawing Begin by tracing or drawing the design on the paper in pencil. Draw lightly and don't erase. Don't worry about mistakes or details at this stage. You will refine the drawing in the next step. Add an initial capital letter if you want. |
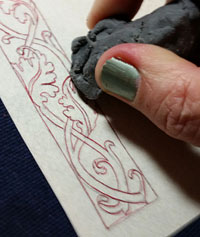 |
Step 2: Inking & erasing Trace and refine your drawing in brown ink with a crow quill pen. As you trace your lines you can overlap the twigs and leaves but try not to. The drawing still doesn't need to be very detailed. You can make your own brown ink by mixing 2 parts red and 1 part black Calli ink and adding an equal amount of water. Store in a tightly capped plastic cup like the one pictured in step 1. Calli is a fast-drying, smear resistant ink. Allow the ink to dry a few minutes then erase all the pencil line. Inking the lines makes them visible through the paint you will apply in the next step. |
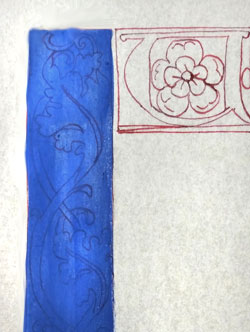 |
Step 3: Background Use a number 4 watercolor brush or a wide flat brush. Don't use a real small brush or one that is too soft. The idea is to cover the area quickly to control streaking. Paint the entire border with the background color. It is okay if the paint is a little blotchy or streaky, but don't go back and touch it up or you will make it worse. The paint should not be too thin, or the paper will curl and blister, especially if you are using Pergamenata, an artificial parchment. You only want it thin enough that the drawing barely shows through. If the paper curls, wait for it to dry completely. Dampen a paper towel and dab it on the back over the the affected area. When that dries, it will even out the curl. |
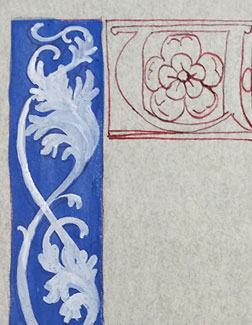 |
Step 4: Sillouette Now for the fun part. Switch to a smaller brush like a number 1 watercolor or liner brush. Mix up some opaque white paint until it flows nicely from your brush but is still thick. You can use Chinese white, zinc white, or, what I prefer, Doctor Ph. Martin's Bleed Proof White. Paint the sillouette of the vines and the leaves using long thin strokes. Start at the tip of the leaf and follow the curve of the cental vein all the way to the point where it joins the twig. Then place another stroke next to the first, following the curve. Continue this way until the entire leaf if filled with strokes that follow the curves in the same way that the leaves grow. This will make streaks that suggest shading and volume. |
 |
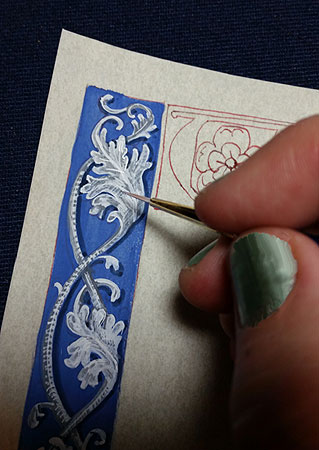
Step 5: Drop Shadows Mix the backgound color with it's complement or black to make a shadow color for the twigs and leaves. Paint this to the right and below each twig and leaf. Now is the time to define which leaf and twig goes over another. Add a little space between the twig and the shadow to indicate where the twig is above the background but not touching. If the shadow is right next to the twig or leaf it appears to be laying in contact with the background. |
 |
Step 6: Grey shadows and white highlights. Using a medium shade of grey, paint over the white on the twigs with short, horizontal strokes. You can also add long verticle shading to the right side of the twigs. Paint the center of the leaves with short strokes next to the spine, and near the ends of the leaves. Shade any part of the the leaf that suggests it is curling. Keep it simple. The less shading the better. Add highlights in white to the tips and edges of the leaves and paint a white line down the center for the spine of the leaf. Do not blend the paint. Let the crosshatching show.
|
 |
Step 7: The Initial Cap Paint a flower or some other scene in the center of the intitial using the same technique. For this blossom I painted the background in two shades of green, the sillouette in pale pink, the shadows in grey, and the highlights in white. Paint the letter in solid red and the box behind it in metallic gold gouache. |
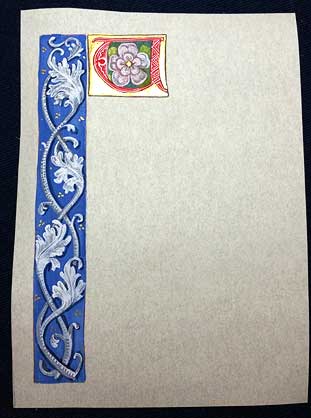 |
Step 8: Final Touches For the white florishes on the initial capital letter, mix the opaque white paint as thick as cream so it covers but as thin as needed so that you can achieve a very thin line with an 00 or liner brush. Paint only with the very tip of the brush to get the thinnest line. Refer to the Isabella Breviary's British Library website for ideas on designs to use. See page 25r. The last step is to add tiny clusters of gold dots in the background of the border. Now your scroll is ready to use for an award, invitation, or announcement. Just add text. |
Variations
Twig borders can be worked in white or yellow ochre over a blue, dark grey, green, or salmon pink background. You can add insects, birds, monkeys, knotwork, pieces of jewelry, fruit and blossoms to the border to make it more interesting. Just make sure you give them all their own drop shadows. Once you master the technique, you can skip a step by painting the sillouette in a medium tone like grey or yellow ocher instead of white. Then all you need to do is add drop shadows and highlights.
References:
Wikipedia: The Isabella Breviary
British Library: Add MS 18851, the Breviary of Isabella I of Castille
Pergamenata and other materials are available from John Neal Bookseller
Thomas Kren and Scot McKendrick, Illuminating the Renaissance: The Triumph of Flemish Manuscript Painting in Europe (Los Angeles: The J. Paul Getty Museum, 2003)
|
If you want to add this article to your list of favorites or email it to a friend, please use this permanent URL, https://stores.renstore.com/-strse-template/1404A/Page.bok. Permission is granted by the author to quote from this page or use it in handouts as long as you include a link back to Renstore.com. |
|
 Previous Article Previous Article |
Next Article  |
